Thursday, August 25, 2011

Thanks For The Memories

Happy Rudolph Day! For my card I water colored the 1998 Penny Black Santa Memories stamp. I added Crayola Glitter glue on Santa’s beard and the stars and Diamond Glaze on his glasses. I layered it on to a scrap of Christmas scrapbook paper, green card and onto my card base with a bit of ribbon to finish it.


This stamp filled my head with warm childhood memories. My Aunty Alice made every occasion special for my family and she loved Christmas. On Christmas Eve she would gather our entire family at Grandma and Grandpa’s house. After a wonderful dinner Aunty would get one of her brothers to dress as Santa. At the appointed hour we would be told to sit in the living room. We didn’t have to wait long before we’d hear HO, HO, HO as Santa came up the front steps. It was sweet agony waiting as he stomped on each of a dozen red wooden steps till he finally came in the door. He’d stand in front of one child after the other and ask ‘Have you been good?’ Of course the answer was always ‘Yes Santa.’ Then he’d say ‘What about the time you did…’ Santa really did know if you were bad or good. He’d pull from his sack a brown paper sack tied with red curling ribbon. Inside was an orange, an apple, a handful of nuts in the shell and a cheap little toy. Not a lot but we loved it. As I grew older I would sit at the end of the line and when Santa would finally get to me I’d give him a hug and whisper in his ear ‘I love you Uncle or Daddy‘. Why did Santa come to our homes so early on Christmas Eve? Well we lived on Maui and Santa always started his deliveries in Hawaii before crossing the ocean to complete his rounds. Hey it worked for us.
THANKS for taking the time to stop by and thank you for your lovely comments.

Have an Amazing Day!


Blessings
Bernie
Click here to give --- It’s Free

Wednesday, August 24, 2011

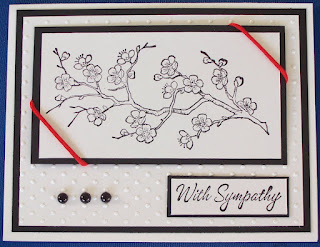
Sympathy

Happy Hump Day! Just a quick post today.

For those who haven’t been following my posts for the last two days, my uncle passed away. I have been posting a series of sympathy cards and childhood memories. This is the last in the series. 


I made identical cards for my two remaining Uncles. For my cards I used: Rubber Stampede’s Cherry Blossom, Swiss Dot EF, an old Stampin’ Up sentiment, black half pearls and a little red Rattail fiber.

Have an Amazing Day!
Blessings

BernieClick here to give --- It’s Free


Tuesday, August 23, 2011

More Sweet Memories

Hello; Hope you are having a wonderful week.  It's gotten a bit to warm for my liking but I'm not ready for summer to end so I wont complain to loudly.
As I said yesterday my Uncle passed away last week.  This post may make more sense if you read my previous post.
My card today is for my cousin Cindy. My Aunty and Uncle were thrilled beyond words when she was born but I remember I was not the least bit happy about her arrival. She’d stolen my limelight. A week or so later Uncle went back on the evening shift I was asked to keep my aunt company again. I did not want to go but Mom insisted. I must have been a sad sight dragging my feet over there and like Mom was so found of saying ‘dragging my lower lip‘. I really didn’t want to have anything to do with that baby and I can remember sitting on the sofa pouting. I’m not sure how she did it but my aunt soon had me madly in love with the little thing. When Uncle kissed my forehead and said ‘Bless You’ that night all was right in my world again and I've been very fond of my cousin Cindy ever since.


For my card I embossed a scrap of white card.  I've added a doily and ribbon then I added my water colored image which was cut and embossed with Standard Circles Lg and layered on Petite Scalloped Circles Lg. The sentiment is computer generated and the heart charm is from my stash.

Have an Amazing Day!
Blessings Bernie
Click here to give --- It’s Free

Monday, August 22, 2011

Sweet Memories

Hi There; Hope you all had a lovely weekend.
I learned Friday evening my Uncle Walter had passed away. My father was one of eight, with Uncle’s passing there are only two brothers left. As a child nearly all of my family lived on the same country road. Grandparents, aunts, uncles and LOTS of cousins. My daily life was filled with family. Sadly over time most move away and because of his poor hearing I hadn’t spoken to my uncle in many years. Still as I made cards for my aunt, cousin, and uncles sweet childhood memories filled my head.

When they were first married my Aunty Violet hated being alone at night while Uncle Walter worked. I was just a little thing but every evening just before dark I would walk next door to keep her company till Uncle got home. I don’t really remember what we did all evening but at bed time she’d tuck me into Uncle’s side of their big bed. When he got home he’d gently pick me up and carry me to the guest room. Most nights he’d wake me but I always pretended I was asleep because I knew just before he’d put me into bed he would kiss me on the forehead and whisper ’Bless you’ then tuck me in. It always made me feel like a princess.  

This card is for my aunt. I began by embossing my card base with Lattice Rectangle. I wrapped my ribbon around the card base and added a printed prayer on the inside to hide the ribbon. I printed my sentiment then cut and embossed it with a smaller Lattice Rectangle. The leaves are Spellbinder’s Foliage. The flowers from my stash.

Thank you for taking the time to visit today. Your comments are greatly appreciated.

Have an Amazing Day!
Blessings
Bernie

Friday, August 19, 2011

Happy Birthday John

Hello! Wow it’s Friday already. I’ve enjoyed playing in the garden and yesterday with my grandson but I am looking forward to a little more crafty time this weekend.

My card today is for the sweet gentleman who delivers Jim’s Liquid Oxygen every Monday. John loves JalapeƱo peppers, as a thank you for all he does for Jim I plant a few plants just for him each year. I am so severely allergic to hot peppers I’m afraid to pick them but John is happy to pick them himself. Monday is John’s birthday and the first peppers of the season will be ready for him to harvest. Couldn’t have timed it better if I’d tried.


It’s a simple card. I scored my card with a space just wide enough for the ribbon to sit in then positioned it in the stars EF to emboss just the top portion and ran it thru the Cuttlebug.  I’ve layered this onto black card then on to my blue card base.  The ribbon is layered on a strip of white then black card stock, just to make it appear a bit broader.  I stamped and embossed the sentiment, black half pearls for balance and it‘s done.

‘Cheap Trick’ Get an ATG gun. Over the years I have foolishly spent a fortune on glue runners, red sticky tape (name escapes me) and a variety of glues because I thought they were cheaper. I got my ATG with a 50% off coupon at Michael’s. It came with two rolls of tape, the glue is wonderful, holds well and lasted for such a long time. I find I use far less of it then I did the glue runners. I no long rely on glues and red sticky tape to make up for the glue runners short coming. Although it hasn’t eliminated the need for glues and red sticky tape, ultimately I find the ATG is a great money saver. Of course I only buy refills when I have a coupon.

Wednesday, August 17, 2011

Lace It Up

Hi There; I hope are all well. I’ve been playing in the garden for the last several days. Lots of pruning and weeding, does it ever end! Of course the fun part is harvesting and eating fresh veggies. I had my first tomato sandwich of the season. Yummy! There will be many more to come but that first tomato is always like a little taste of heaven to me. I got to play with my grandson on Friday. We went grocery shopping and just had to stop into a few thrift shops and craft shops. He loves them as well but he enjoyed his swim time most of all. I’ve been baking and entering again. I baked banana nut bread much to the delight of Jim and the neighbors. I have keys to my neighbor’s homes and I love to surprise them by dropping off goodies while they are gone, thus the term baking and entering was born. I did find some play time in the closet. 


I made this card for our daughter Kim, today is her birthday. I water colored my rose to look like the Double Delight rose blooming in my garden. I cut it out with Rectangle Lattice. It is layered on a scrap which I cut out with my craft knife around the same die. I’ve had eyelets in my stash for years but never used them until I saw Mandy’s card here. I loved how she laced her card and although I like the lacing on my card I think Mandy’s card is much prettier. The butterfly charm is from Michael’s.

Thank you for stopping by, your visit is always appreciated.
Have an Amazing Day!
Blessings Bernie

Click here to give --- It’s Free


Wednesday, August 10, 2011

Cherish This Day

Hi There;  Happy Wednesday! 


This card was inspired by a challenge on SCS some time ago.  There were some very inspiring cards summited, each using a lattice.  For my card I trimmed some white scraps to size. I cut two frames with an original Sizzix Frame Scallop Oval die. I wove and glued my lattice to one frame then sandwiched it with the other. I ran it thru the Cuttlebug in a Swiss Dot EF. I backed it with some pale green PP although the pattern doesn’t show here. The background was stamped with Versa Mark using Great Impressions’ Rose Background stamp then chalked lightly. The Sentiment is from Printworks, Alphabet Soup, Celebrate Life. The large leaves are Spellbinders Foliage. I made the purple organza flower added some MS greenery and a few EK Success flowers.  

‘Cheap Trick’ Make your own stamp positioner. I made mine out of two layers of foam core. Until I mistakenly pitched it out I had one made our of several layers of chip board aka cereal boxes. I’ve hear of people using Lego blocks. As long as you have a right angle that is deep enough to position your stamp within that angle it should work just as well as any pricey manufactured one.  
  

THANKS for taking the time to stop by and thank you for your lovely comments.

Have an Amazing Day!

Blessings
Bernie
Click here to give --- It’s Free


Tuesday, August 9, 2011

Authentique Candies

Authentique is a brand new manufacturer located in
Utah and all product is produced locally.
Authentique comes to the paper crafting world with
an excellent pedigree with over 40 years combined
experience in the paper craft industry, the founders
being previously My Mind's Eye, Girls Paperie and
Doodlebug.


Mina at Pinkpuds is offering Authentique’s Pink paper pad and Bunny Zoe Crafts is offering Authentique’s Blue paper pad. Both look so yummy! Mina makes beautiful cards and her coloring is absolutely amazing. Mina is on the design team at Bunny Zoe Crafts, she and her fellow DT members are all marvelously talented. I think it’s well worth your time to have a look at both these wonderful blogs. 
Good luck!
Blessings
Bernie

Scraps - Snippets

Whatever you call them they do accumulate.  I agree with Jules, they do seem to breed and multiply. These were to small to keep or were they. I have such a difficult time tossing even the smallest bit of paper so I put little matching pieces in snack size zip bags and keep them where I'll see them often and hope for inspiration. When I learned a friend will be having a little boy in Dec. these blue bits spoke to me; “We’d be perfect for a baby quilt card.” And really, I had to agree.

Edit:  I entered the wrong link at Jules last week so I've entered this card again at Jules' Crafty Snippet Challenge -Week 32


I cut my squares and strips to size, adhered them to a scrap of printer paper placed it in an EF and ran it thru the Cuttlebug then layered it on to another scrap and on to my card base. Our ‘Big Lots’ doesn’t have much in the way of craft supplies but I did find some cute brads there including this sweet little teddy bear.  I had just enough of this ribbon to make the bow.  I just accordion folded it and used the brad to hold it together then fanned it out. A few buttons and it’s done. Didn’t make much of a dent in my scrap file but they didn’t get tossed so I’m pleased. I will enter this in Jules’ Crafty Snippet Challenge - Week 31.  Check it out, lots of inspiration on how to use up those snippets/scraps. 
Thank you for stopping your visit is always appreciated.Have an Amazing Day!
Blessings Bernie

Click here to give --- It’s Free

Monday, August 8, 2011

Happy Birthday Anniversary

Hello!  Today my friend and neighbor is celebrating the 23rd Anniversary of her second birthday. Yes you read that right. You see on 8-8-88 Lanette was blessed with a bone marrow transplant. Her brother was the perfect match. As a result she was completely cured of her leukemia. She calls Aug. 8th her second birthday and this is the 23 anniversary of that most important day. So my card today is for her.


I embossed a scrap of green cardstock with the Swiss Dot EF and lightly sanded the dots. The pink is a scrap of the cardstock I used a few days ago already embossed with those sweet little hearts. I layered on some lace then the purple which I found already scalloped in my scrap file. The sentiment was cut with QuicKutz Cookie Cutter Dies Basic Phrases. I made the flourish using my homemade acetate template and some silver pearls from Michael’s. The butterflies were stamped with versa mark on velum and embossed with white EP, hand cut and layered one on top of the other with iridescent beads for the body. The rhinestones in the corner changes color from a pale pink to a dark purple when the card is moved. I love how the feathers soften the feel of the card. You may notice the lower feather has slipped out of place but it was properly secured before I gave the card to Lanette.


Have an Amazing Day!
Blessings Bernie
Click here to give --- It’s Free


Sunday, August 7, 2011

Cute As A Button

Hi There, Sorry I’ve been MIA.   Sometimes life just gets a bit stressful and stomps on those creative juices.   I’ve decided to throw those stressors out the window and concentrate on happier thoughts.   What could be happier then thinking about the Great Granddaughter we are expecting in Nov.  There are 12 boys and 7 girls in our family so I am thrilled the new addition will be a little girl.  I'm sure she will be as cute as a button.   This card will go to her parents when the time comes.


This is another 50 cent stamp found at yard sale. It is mounted on a strange shaped bit of scrap wood. After stamping it several times and all but standing on it I realized it was mounted unevenly with some sort of mega strong glue. Believe me that stamp is NOT coming off that wood. I finally tucked a bit of card stock between the rubber and the wood where the glue was missing. This  gave me a complete image. Isn’t she adorable? I water colored her, cut her with Standard Circle Lg. and layered onto Petite Scalloped Circle Lg. then onto a doily I had chalked lightly. My pink background was run thru the Cuttlebug in an EF that came with my bug. Don’t you just love those tiny button brads, I found them at Michael’s. The Sentiment is a Studio G $1 stamp. A little ribbon, a button and some hand stitching finished it off.
Thanks for stopping by today. Your comments are greatly appreciated.
Have an Amazing Day!
Blessings
Bernie
Click here to give --- It’s Free


Wednesday, August 3, 2011

LOVE

Hi There, I hope you are enjoying a lovely day.

I think this card could be used for a wedding, anniversary, engagement or just to let someone know they are loved. 

This was a quick card.  I used my MS scoreboard to score my card then punched the edge with my Fiskars scalloped punch. It was layered on to my favorite blue card and then on to the card base.  Teeny tiny half pearls were added where each score line intersects. The sentiment was stamped with chalk ink then cut with Classic Ovals Lg and layered on to Scalloped Ovals Lg. A pretty white ribbon and bow to tie it all together.

Thanks for stopping by today.  Your comments are greatly appreciated.

Have an Amazing Day!
Blessings
Bernie

Tuesday, August 2, 2011

Iris Fold

Hello! 
Holy Cow It’s August! Summer sure is rushing by. Hope you are all having a wonderful week.


Some time ago I saw this technique and filed it in the back of my brain. I believe I did it wrong but I kind of like the results I got. I mixed a few drops of rubbing alcohol and a few drops of re-inker, dabbed a cotton ball into it and swiped it across glossy card stock. When it dried I stamps my image with Stazon. I really need to learn how to do this technique properly. Can anyone tell me what it’s called?

I used an original Sizzix die to cut out a scalloped oval window in my card base.  The iris fold was done with tissue paper. I then placed the card in a Swiss dot EF and ran it thru the Cuttlebug. I mounted my image from the inside of the card then covered the not so pretty inside with a plain bit of cardstock. I started out chalking the edges of the card but like the look and just chalked the entire thing.  I finished with some tiny pink rhinestones and a few butterflies.


Thanks for stopping by.  I appreciate your comments. 


Have an Amazing Day!
Blessings
Bernie

Sunday, July 31, 2011

Blog Candy

Kathy at The Daily Marker is celebrating her 2ND
Blogversary with a lovely give away. Head on over and check out her wonderful blog. She shares such brilliant ideas. 
Good Luck!

Blessings
Bernie

Saturday, July 30, 2011

Blue Christmas

Hi There
Hope the weather is treating you well, summer has arrived here.  It's gotten very warm.  We have really been spoiled thus far.  Although we aren't setting any records it feels like we are.  When you're hot, you're hot.


As I said before I LOVE Father Christmas.  I've got a small collection I look forward to bringing out ever Christmas, like seeing old friends.  One of my favorites wears a blue velvet coat and hat.  He inspired me to watercolor my lovely stamp again.  This time I used my pencils and paint brush with water instead of a blender pen.  I added some Crayola glitter glue to the fur on his coat.  Layered on to Spellbinders Lattice Rectangles and on to my card base and rounded all corners.  The gems and ribbon are from my stash.


Have an Amazing Weekend
Blessings
Bernie

Friday, July 29, 2011

Sisters at Heart

Hi There

Hope you are enjoying your day and looking forward to a lovely weekend.


I made this card for my dearest friend. Susie is my forever friend. She has known me forever, well since high school and beyond. She knows all my secrets, where all the bodies are buried and she loves me anyway? And I love her. Susie reminded me recently that we will soon be celebrating the 50th anniversary of our friendship. We met on the first day of high school and have been the best of friends ever since. Susie loves all shades and hues of purple.


The frame was made using a MS daisy border punch. Becca at Amazing Paper Grace has a wonderful tutorial on how to
Punch A Perfect Border Frame here.


The little hearts were already embossed on the pink card stock when I found it. I made the white flower from organza ribbon. The sentiments is a Michael’s $1 rubber stamp. Everything else is from my stash and you know was either found in a thrift shop or yard sale.


Don’t know why I can’t get a decent photo of it but the inside says:

Not Sisters At Birth

But we knew from the start

God put us together

To be Sisters at Heart.

Cheap Trick:  Becca of Amazing Paper Grace has an amazing talent for looking at her punches and coming up with fascinating new ways to use them.  Use the link above to go to her YouTube channel.  Unlike others Becca cuts to the meat of the subject and gives simple to understand directions without endless chatter.  Be warned you maybe there for a while as she has many tutorials.  Not just on the use of punches but all things Spellbinders and ribbon as well. 

Thanks for visiting. I appreciate your comments.
Have an Amazing Day
Blessings
Bernie

Thursday, July 28, 2011

Flower Tutorials

Second post today, please scroll down for my earlier post.
I have two quick and easy tutorials on how to make your own flowers.

The fabric, the number of petals and the size you use will give you a variety of end results for each of these.

Poinsettia


Cut your ribbon or fabric in to squares, one for each petal. For my poinsettia I used five petals of 1 ¼” red craft ribbon.


Fold each square in half and then in half again.
Straight stitch along the raw edge of each petal. Two important points to keep in mind: Keeping your folded edges all facing the same direction will give the most pleasing result.  Your stitches should all be the same distance from the edge of your fabric. This will result in your petals being all the same size.


After stitching all your petals onto your thread gather them tightly together and tie into a circle. You will need to fiddle with it till you get it looking 'just right'. Glue on to a small circle of card stock appropriate to the size of your flower. I used hot glue but you could use any strong adhesive. Decorate the center. I glued yellow seed beads to the center of my poinsettia and added some green grosgrain ribbon for leaves.

Organza Flower


Cut your material in to squares. For this flower I used five petals of 1 1/2” organza ribbon. 


Fold each petal in half and straight stitch around the two raw edges. Keeping your stitches the same distance from the edges will result in all petals being the same size. After stitching all petals onto your thread gather them tightly together and tie into a circle.  Adjust your petals till you get them looking 'just right'. Glue on to a small circle of card stock appropriate to the size of your flower. I used hot glue but you could use any strong adhesive. Decorate the center. I stitched a few beads to the center of mine.


For each of these flowers you could add more petals and make a fuller flower or you could also make a second layer of smaller petals and layer those onto the larger layer.

If you have any questions I'll be happy to try to answer them.
I hope you will have fun with these and share what you come up with.
Have an Amazing Day
Blessings Bernie

Father Christmas


I LOVE Father Christmas. When I found this 1996 Hero Arts Stamp in a thrift shop a few days ago I just had to have him. I did it Di, I colored him! I used my watercolor pencils but when I used my blender pen I lost all my shading. I watched a few videos on YouTube and learned what I had done wrong. I should have watched them first. I’ve since picked up some paint brushes and will soon be trying it again. Not sure if I enjoy coloring but at least I didn’t hate it.

He turned out well enough that I layered him on red then green cardstock. I finally got to use my snowflake embossing folder and paper from the DCWV Christmas Combo Matstack. I found both on clearance last Feb. I believe the little snowflake came from that same sale. I made the poinsettia. Love this little flower so easy to make and the results are so different depending on the materials used.

Cheap Trick: Shop the after holiday sales. After each holiday the retailers must move this years stock to make room for the next holiday’s stock. He could store things but he knows the producers are working hard to come up with new colors, styles, patterns etc. for the following year. He also knows his customers want those new items and will likely pass over the previous years stock. So he saves himself the headaches and slashes prices.   As they say 'eventually everything old is new again'.

Thanks for visiting. I appreciate your comments.
Have an Amazing Day
Blessings
Bernie

Wednesday, July 27, 2011

Snowflake

Hi There;

With everyone complaining about the weather I almost feel guilty that we have been enjoying perfect weather here.

I have a wonderful neighbor who brings me ‘pretty things’ she thinks I may be able to use on a card. Recently she gave me a bit of torn paper with 'sugar' on it.

I trimmed it to size mounted it on some pretty blue card stock and on to my card base. The snowflake is recycled from a Christmas card I received last year. I tied on a matching ribbon. The ribbon didn’t hide a little blue blemish so stamped JOY directly on it, no more blemish.

Cheap Trick: Save your old blades. When your blade no longer gives you a nice crisp edge save it. Use the old blade to cut thru any damaging material then if needed go back with your good blade for that crisp edge. I also save my worn paper trimmer blades and use them when experimenting on a new project. Just a little way to give your blades a little longer life.
Thanks for stopping by. Your lovely comments make my day, thank you.
Have an Amazing Day
Blessings
Bernie


Tuesday, July 26, 2011

Quick!!


Hi There;
I do hope you are having a wonderful day.

Yesterday afternoon my neighbor came over and asked if I could make a graduation card for a young man. Sure, When do you need it? In an hour or so. WHAT! She had totally forgotten about a party she needed to go to and had to be there in two hours.

I rushed to the closet, stamped some white card stock with my Inkadinkado graduation background stamp and layered it on some red then black card stock and mounted it on a card blank. I had the template of the mortar board in my file, I quickly traced it on to a shiny black scrap, cut it out and added a sad little tassel. It was done in record time.

She picked up the card on her way to the party and was pleased with it.

I don’t think I’ve ever made a card so fast. I’ve had no mojo for several days but this sure brought it back.

Thanks for stopping by and thank you for your lovely comments, they make my day.
Have an Amazing Day
Blessings
Bernie